
Stone Pen Holders
Whenever I make a pen that has 2 parts, like a cap and a body or a twist pen with an upper and lower section, I always make sure … Continue reading
What’s in a name?
If you are a returning reader, you probably notice the blog has been given an overhaul. And even the title of the blog, as well as my company itself, have new … Continue reading
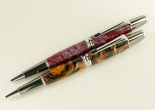
Stone Pen Series Pre-Order
Over the years I’ve made pens from a wide variety materials. Historic wood, the handle of a hockey stick, acrylic, even discontinued acetate. But most recently, I tried something truly … Continue reading
That Instagram Thing & GW Pens
OK, I really haven’t forgotten about my blog. It seems that most of what I’ve had to say lately has been much easier to capture with just a picture and … Continue reading

New Bessey Clamp Review
I was recently in touch with Bessey Tools North America. They were offering some clamps for me to try out and asked if I would write a review of exactly … Continue reading

Anatomy of a Fountain Pen
Have you ever wondered about fountain pens? Wondered how they work and just what the heck it looks like on the Inside? Well sit back, because I am about … Continue reading
Upgraded Ink!
The finer details are sometimes overlooked. When people use a disposable pen, they often don’t think about ‘how’ it writes, just as long as it gets the job done. But … Continue reading

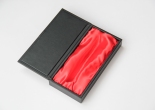
New Item – Leather Journals!
You may recall a few months ago I started to offer handcrafted pen boxes. That was part of a bigger vision that I have for Greco Woodcrafting. As a pen … Continue reading
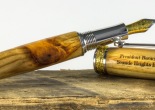
Commissioned, Pen for President of the United States
After being commissioned to make a matching pen set for Prince Harry and Governor Christie to commemorate their trip to Seaside Heights, NJ, I was next asked to make … Continue reading

Commissioned to make pens for Prince Harry and Governor Christie
Like I’ve said in a previous entry, I am the Master Pen Maker for the Historic Pen Company (HPC). I still run and operate Greco Woodcrafting, but I am also … Continue reading
